Fun Halloween Projects for Kids
My granddaughter, a kindergartener who just turned six, loves to do projects. Every Tuesday afternoon, I get to spend a few one-on-one hours with her while her older brother is busy with another activity. Sylvia loves baking, painting, and crafts, so I try to choose simple, age-appropriate activities that are fun for both of us. This week, we did four easy Halloween treat activities.
1. Bats
Supplies: Oreos, edible eyes, frosting.
I make a quick, easy frosting with powdered sugar and milk, but canned frosting works, too. You could also use this frosting to make the eyes if you don’t have edible eyes.
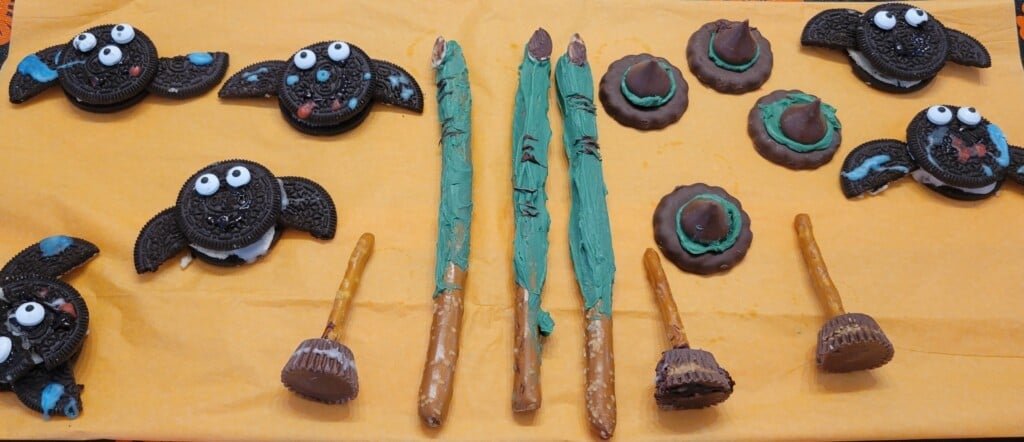
Separate two Oreos. Cut one half into halves for the wings. Put the wings on one half of an Oreo, use a dab of frosting as glue, and put the top half on. Let the child be creative and make the bat faces. My granddaughter used three eyes on some bats and got a little graphic, deciding a few were vampire bats and needed drops of red frosting by their mouths. We used gel frosting, but you can use regular frosting and a toothpick to draw the mouth.
2. Witch’s fingers
Supplies: Pretzel rods, green candy wafers, sliced almonds.
Follow the directions for melting the candy wafers (I bought them from Michael’s), then dip the pretzel rod about 2/3 of the way to make the finger. Add a sliced almond for the fingernail. Dip in chocolate if you prefer. We melted chocolate chips to brush on fingertips and dipped a toothpick in the melted chocolate to draw the lines on the knuckles.
3. Witch’s Hats
Supplies: any flat chocolate cookie. I used Keebler’s Fudge Mint Delights. You also need Hershey’s Kisses, toothpicks, and green frosting.
We used the green candy wafers that I had already melted for the witch’s fingers. This is so simple that even a toddler could do it with supervision. Put a small amount of the melted green wafers on the bottom of a Hershey’s Kiss and then place the Kiss on top of the chocolate cookie. Some of the green should ooze out around the Kiss. An extra touch would be to add some orange sprinkles around the kiss, but we didn’t have any.
4. Witch’s broom
Supplies: Small Reese’s cups, pretzel sticks, and frosting.
I used the end of a toothpick to start a small hole in the top of the Reese’s cup. Put a dab of frosting (we used the melted chocolate chips) to act as glue to secure the pretzel to the candy. Put the pretzel stick upright in the center of the candy.
These are easy projects that young children can complete with a little supervision. I always put down a waterproof, washable tablecloth so I don’t have to worry about messes and spills. Sylvia puts on an apron to protect her clothes.
Our completed projects may not be Pinterest-worthy, but we had a great time doing them together. Let your child or grandchild be creative and feel a sense of artistic ownership. My granddaughter loves mixing colors, so I make a big bowl of powdered sugar and milk frosting, then divide it into two or three small bowls so she can mix colors. You can do the same with canned frosting. One unintended perk is that this process teaches primary and secondary colors. My nine-year-old grandson didn’t mind missing this activity, but he loved eating the results of his sister’s work.
As I’ve said, I’m not an artistic or creative person, but I love doing activities like this. Time is the most precious gift, and one of the best parts of being a grandparent is spending time with my grandchildren. Afternoons spent with my grandkids allow me to relive some of my favorite parts of being a mother, and that is a joy beyond words.