5 Simple Science Experiments!
Plus more stay-at-home activities
Joss loves science experiments. We are even getting him a microscope for his birthday, which he is very excited about! Earlier this week, he kept asking to do a “milk and markers” experiment. While we haven’t done that one yet (sounds like a waste of milk and markers?!), we have done a few others. I wanted to share them here because, if you spend more time at home than anticipated, these might be the perfect way to pass some time!
Do I know much about the science behind these experiments? Not really. We mostly just like mixing things together and seeing what happens. But I’ll try to include links to explanations in case you are interested!
We got most of these ideas from this list of “63 Easy Science Experiments for Kids Using Household Stuff.” So if you try these experiments and need more ideas, head over there for plenty!
One of the members of our Facebook group, TulsaParents, also shared some great ideas for activities that she and her son have done together. So I will also include those at the bottom of the article. Thank you, Jen and Noah Handsel!
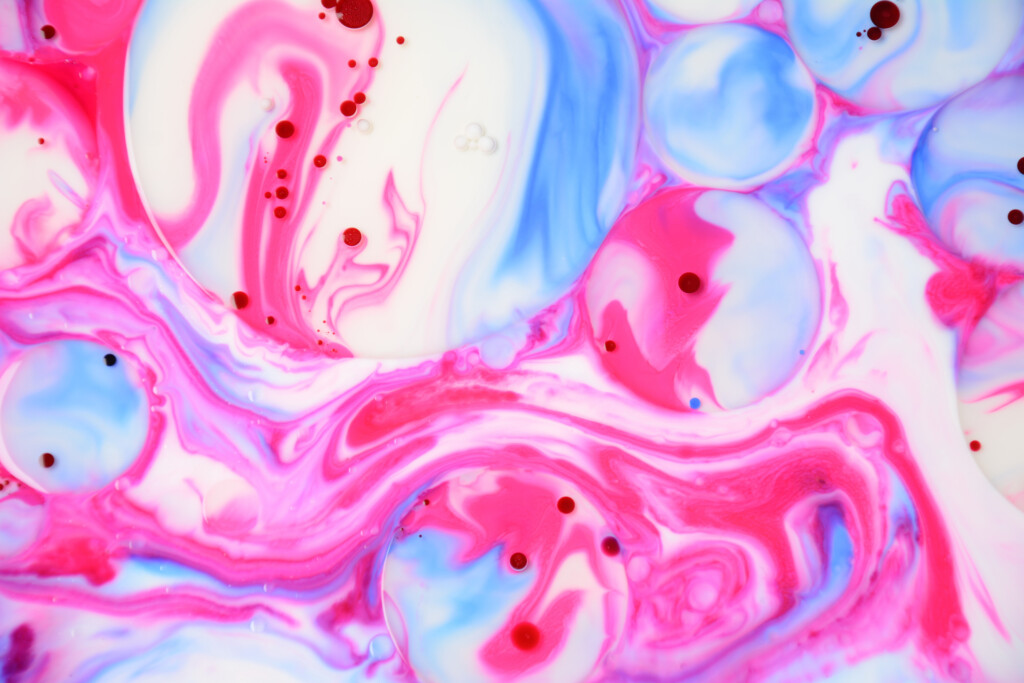
1. Swirly Milk Experiment

Materials Needed:
- Milk
- Food coloring
- Dish Soap
- Shallow Dish (we used a paper plate)
Instructions:
Cover the bottom of your dish with milk.

Add a few drops of food coloring near the center of the dish. Use 3-4 different colors.

Add a few drops of soap into the center of the dish. Watch as the colors move away from the soap, creating beautiful swirly patterns!

Scientific Explanation: Find it here
2. Homemade Lava Lamp

Materials Needed:
- Clear glass
- Water
- 1/4 c. Oil
- Salt
- Food Coloring
Instructions:
Fill the cup 3/4 full with water. Add a few drops of food coloring.
Slowly pour the oil on top of the water. Make sure to observe the separation of water and oil!

Start adding salt to the surface of the oil. Watch as the oil balls up and sinks to the bottom, creating a lava lamp-like experience!
Scientific Explanation: Find it here.
3. Homemade Bouncy Balls!
Disclaimer: When we did this, the balls did not really bounce. However, it was still a fun experiment and the mixture did create a rubbery substance that could be formed into a ball shape and dropped on the ground! Also, make sure your kid doesn’t put this in their mouth, as it is definitely not safe to eat!

Materials Needed:
- 1 Tbsp. Elmer’s Glue
- Food Coloring
- 1/2 tsp. Borax
- 3 Tbsp. Cornstarch
- 4 Tbsp. Warm Water
- 2 Plastic Cups
- Something to Stir With
Into one cup, add the glue and food coloring and mix together.

In the other cup, stir together warm water, cornstarch and borax.
Add the cornstarch mixture to the glue mixture and stir together. This mixture will begin to come together into a rubbery mass.

Fun for everyone!
After awhile, remove the congealed mixture and use your palms to roll it into a ball shape. Keep rolling until the mixture is no longer sticky and holds its shape. Make sure you have paper towels on hand in case things get messy!
Scientific Explanation: Find it here.
4. Homemade Butter
The best thing about making homemade butter? You can turn it into a dance party! Just turn on your favorite groovy tune and shake it off! You get some wiggles out AND some yummy butter! For more active activities at home, I recommend Cosmic Kids Yoga.
Materials Needed:
- Whipping Cream
- Air-tight container
- Salt (optional)
Method:
Put whipping cream into your air-tight container. Don’t fill it completely full, as you will want space for the cream to move around.

Shake, shake, shake! First the whipping cream will turn into whipped cream. But don’t stop there! Keep shaking until the buttermilk separates from the solid mass that is your butter. Pour out the buttermilk and try it–it’s delicious!

It’s not beautiful, but it is butter!
Add salt to finished butter if desired.
5. Water and Black Markers Experiment
This is one we first did a few months ago when Discovery Lab was celebrating National Chemistry Week! It’s about as easy as it gets, and Joss has asked to repeat this experiment more than once.
Materials Needed:
- Coffee Filter
- Black Marker
- Water
- Baking Tray
Method:
Lay out the coffee filter on the baking tray.
Make a circle in the middle of the filter using the black marker.

Fold the filter and dip the black part into the water.

The water will cause the colors in the black marker to separate. Leave it out for awhile. At first, we just saw the black transform into a lighter blue. But eventually, we were able to see a ring of red around the rest of our images.

More Ideas, from Jen Handsel
- Make a parachute using a plastic bag and sewing thread
- Grow bean plants facing different directions of sunlight

- Make a solar-powered house using a garden light
- Use recylables to build a jet pack

- Make paper boats out of different kinds of paper. See which sink and which ones float!
What are your favorite science experiments or similar activities to do at home? Leave your suggestions in the comments!